# Graphics programming
The world of computer graphics is vast and ever-growing. We will limit ourselves mostly to the common practice of real-time rendering using the OpenGL library, probably the most widely used graphics interfaces in use today. [OpenGL is an open standard](http://www.khronos.org/opengl/) implemented by most graphics processing unit (GPU) hardware in personal computers and mobile devices. Similarly, for writing programs on the GPU we will use OpenGL Shader Language (GLSL). Although some of the text here is specific to OpenGL/GLSL, the general process is applicable to many other rendering systems.
> Rather confusingly OpenGL and GLSL have many different versions. We will work against OpenGL version 2.1, which is more compatible with the various operating systems on laptops today, and closer to the OpenGL ES 2.0 available on most mobile devices. For GLSL (GPU) programming, we will use version 1.2, which correponds to OpenGL version 2.1. It's worth nothing this, because a lot of tutorial material out there on the internet is for older or newer versions of OpenGL, and thus easily misleading.
The OpenGL API (application programming interface) is specified for the C language, however we will be using it from within Lua. It is in most cases very easy to translate OpenGL code from C to Lua. Any function prefix **gl** becomes **gl.**, and any constant prefix **GL_** also becomes **gl.**. Finally, some functions in Lua can be simplified by leveraging Lua's dynamic typing support, so for example we can use **gl.Color** instead of **glColor4f**.
## Good old-fashioned OpenGL 1
Before leaping into GL 2.1, it's worth seeing how things used to be done, because although it is less flexible or efficient, in many ways it is easier to learn.
The first thing to learn is that OpenGL is highly **stateful**. For example, **gl.Color()** will set the current color, and any geometry drawn after it will use that color, until another **gl.Color()** changes it. You can think of it like the current brush in your hand. OpenGL also uses state to store spatial transformations, such as the view and object (gl.MODELVIEW) and the current perspective (gl.PROJECTION).
### Geometry
Geometry in OpenGL is specified as a series of *vertices*, where each vertex has a position in space, and possibly other attributes such as color, texture coordinate, normal direction, and so on. Vertices simply define a set of points, but we can instruct OpenGL to interpret them as surfaces (or lines, or points) using the following constants:
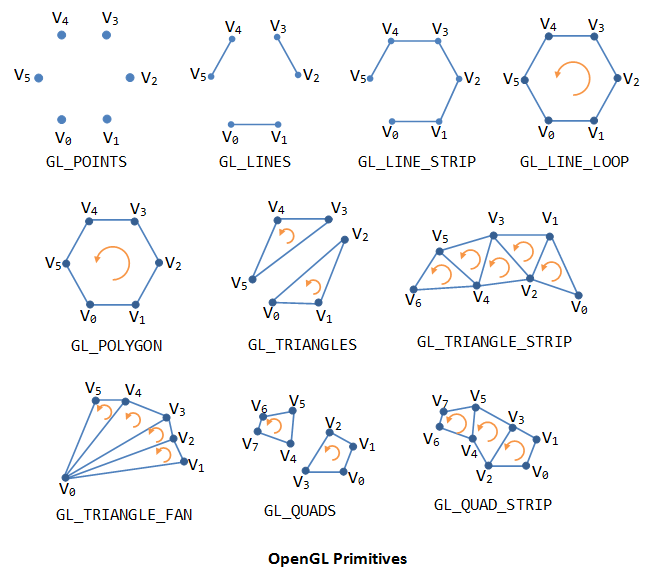
In OpenGL 1 this is done using the **gl.Begin()** call, e.g. **gl.Begin(gl.LINES)**. After a **gl.Begin()** we can issue a number of vertices using **gl.Vertex()**, and finally finish our shape using **gl.End()**:
```
local gl = require "gl"
function draw()
gl.Color(1, 1, 1)
gl.Begin(gl.LINES)
gl.Vertex(0, 0, 0)
gl.Vertex(1, 1, 0)
gl.End()
end
```
To change attributes of each vertex, we must call the attribute setters before the corresponding **gl.Vertex()**:
```
local gl = require "gl"
function draw()
gl.Begin(gl.LINES)
gl.Color(0, 0, 1)
gl.Vertex(0, 0, 0)
gl.Color(1, 0, 0)
gl.Vertex(1, 1, 0)
gl.End()
end
```
Some common geometries have been abstracted in the **draw2D** module:
```
local draw2D = require "draw2D"
function draw()
draw2D.color(1, 0, 0)
draw2D.rect(0, 0, 1, 1)
draw2D.color(1, 1, 0)
draw2D.ellipse(0, 0, 1, 1)
end
```
### Transformation stacks
If we want to render the same geometry at different locations, scales and rotations in space, we would normally have to recalculate the positions of each argument to each **gl.Vertex()**. Instead, OpenGL provides transformation stacks. The default stack is the *MODELVIEW* stack, which represents the current location, scale and orientation of geometry in the world. You can *translate*, *rotate* and *scale* the modelview. You could think of translation as meaning changing the 'start point' (in mathematical terms, the "origin") of drawing. Or you could think of it as moving the underlying "graph paper" that we are drawing onto. Similarly for the rotating the paper, or scaling it.
```
local draw2D = require "draw2D"
function draw()
draw2D.translate(-1, 0)
draw2D.scale(0.5, 0.5)
draw2D.color(1, 0, 0)
draw2D.rect(0, 0, 1, 1)
draw2D.color(1, 1, 0)
draw2D.ellipse(0, 0, 1, 1)
end
```
Unlike gl.Color(), draw2D's *translate()*, *scale()* and *rotate()* do not replace the previous values; instead they accumulate on top of each other into a hidden state called the transformation matrix, which is a fancy name for how we get from the coordinate system in which we are currently drawing to the coordinate system of the actual output pixels.
Note that the order of transformations is important: translate followed by scale is quite different to scale followed by translate. For controlling an object, usually the order used is "translate, rotate, scale".
The transformation stack is called a *stack* because you can push and pop it:

*Pushing* the stack allows you to modify the transformation temporarily, and then later *pop* back to the previous state. Usually OpenGL provides up to 16 possible transformations on the stack.
```
local draw2D = require "draw2D"
function draw()
draw2D.push()
draw2D.translate(-1, 0)
draw2D.scale(0.5, 0.5)
draw2D.color(1, 0, 0)
draw2D.rect(0, 0, 1, 1)
draw2D.pop()
draw2D.color(1, 1, 0)
draw2D.ellipse(0, 0, 1, 1)
end
```
The **draw2D** module provides push, pop, translate, rotate and scale for 2D rendering. For more complex rendering, use **gl.LoadMatrix()** (to replace the previous value) or **gl.MultMatrix()** (to accumulate with the previous value) in combination with one of the matrix transform generators in the **mat4** module:
```
-- this does the same thing as the previous script:
local gl = require "gl"
local draw2D = require "draw2D"
local mat4 = require "mat4"
function draw()
gl.PushMatrix()
gl.LoadMatrix(mat4.translate(-1, 0, 0))
gl.MultMatrix(mat4.scale(0.5, 0.5, 1))
draw2D.color(1, 0, 0)
draw2D.rect(0, 0, 1, 1)
gl.PopMatrix()
draw2D.color(1, 1, 0)
draw2D.ellipse(0, 0, 1, 1)
end
```
With this we can easily now create ideal visual forms, and then create instances of these forms with different position, scale and rotation, however we please. We're about ready for some generative design...
> Warning: if you want to do something computational according to the position, it's better not to use the OpenGL transformation stack, as it does not give you access to the computed position. Instead you'll have to compute it manually...
## OpenGL 2 pipeline
The typical task of an OpenGL program is to take as input some 3D geometry and other parameters, and render it by setting the color value for each pixel in the application window. This involves a series of transformations between [spaces](space.html), and different kinds of programming tasks at each stage of the transformation. Some of the earlier steps of these operations occur on the computer's CPU, while the later operations occur on the graphics hardware (GPU). The flow of data through this process is almost always unidirectional, hence it is sometimes called the 'rendering pipeline'.
[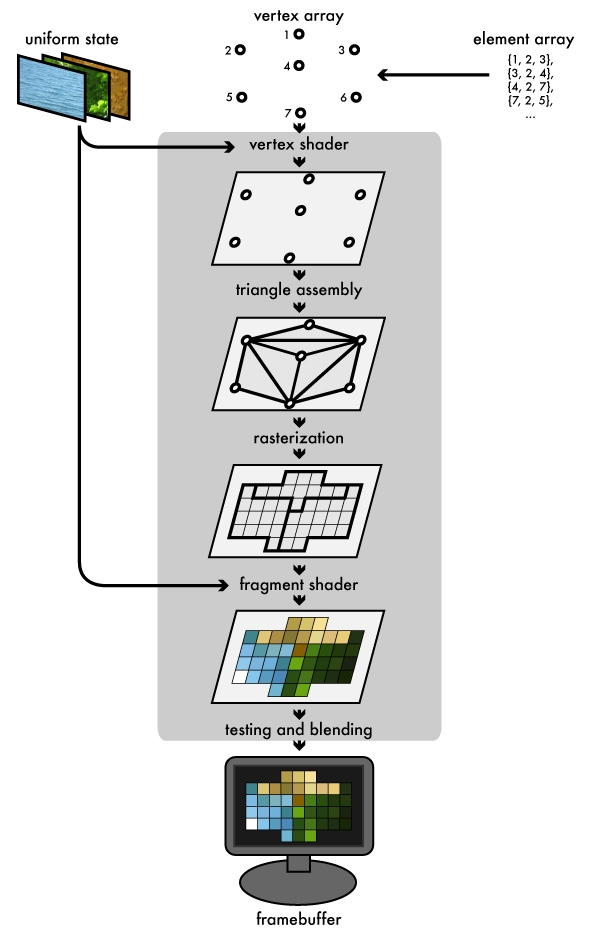](http://duriansoftware.com/joe/An-intro-to-modern-OpenGL.-Chapter-1:-The-Graphics-Pipeline.html)
The host program fills OpenGL-managed memory buffers with arrays of vertices; these vertices are projected into screen space, assembled into triangles, and rasterized into pixel-sized fragments; finally, the fragments are assigned color values and drawn to the framebuffer. Modern GPUs get their flexibility by delegating the "project into screen space" and "assign color values" stages to uploadable programs called shaders.
## Shader program
At any time the GPU may have one shader program bound. Typically the shader program will contain a vertex shader and a fragment shader. These allow us to insert our own code into the rendering pipeline at the vertex transformation and fragment coloring stages.
## Vertex shader
Each vertex in the vertex array is sent through the vertex program. The vertex program determines how to modify each vertex. At minimum, it must compute the actual position of the vertex in screen space (by setting the **gl_Position** variable).
Here is a simple vertex shader:
```
// the input position of the vertex:
attribute vec3 position;
void main() {
gl_Position = vec4(position.x, position.y, 0., 1.);
}
```
Vertex shaders may make use of **attributes**, values that are set for each input vertex. Typical vertex attributes are position, color, normal (surface direction), texture coordinate (for applying texture mapping).
Note that the GLSL language provides support for vector types (vec2, vec3, vec4) and matrix types (mat2, mat3, mat4) in the language itself, since these are so fundamental to graphics programming.
## Fragment shader
For each pixel of a rendered triangle, the fragment shader is run to compute the pixel color (by setting the **gl_FragColor** variable). Here is a simple fragment shader:
```
uniform vec3 lightcolor;
void main() {
// paint all pixels opaque red:
vec3 red = vec3(1, 0, 0);
// compute pixel color by multiplying with the light color:
vec3 color = lightcolor * red;
// store that as the result, with an alpha (opacity) value of 1:
gl_FragColor = vec4(color, 1);
}
```
A **uniform** is a way to pass data from the CPU to either vertex or fragment shader. Uniform data has the same value for all vertices/fragments, but can change in successive renders. References to textures are also passed as uniforms (of type **sampler2D**).
Loading, compiling, linking and using shaders requires some fiddly OpenGL code, which we have abstracted into the **shader** module (take a look inside it to see how it works):
```
-- load in the shader utility module:
local shader = require "shader"
-- write the GLSL code:
local vertex_code = [[
// the input position of the vertex:
attribute vec3 position;
void main() {
gl_Position = vec4(position.x, position.y, 0., 1.);
}
]]
local fragment_code = [[
uniform vec3 lightcolor;
void main() {
// paint all pixels opaque red:
vec3 red = vec3(1, 0, 0);
// compute pixel color by multiplying with the light color:
vec3 color = lightcolor * red;
// store that as the result, with an alpha (opacity) value of 1:
gl_FragColor = vec4(color, 1);
}
]]
-- use this GLSL code to create a new shader program:
local myshaderprogram = shader(vertex_code, fragment_code)
-- the rendering callback:
function draw()
-- start using the shader:
myshaderprogram:bind()
-- set a shader uniform:
myshaderprogram:uniform("lightcolor", 0.5, 0.5, 0.5)
-- RENDER VERTICES HERE
-- done using the shader:
myshaderprogram:unbind()
end
```
## Vertex buffers
To make use of the shader we must send some vertices. Each vertex may have a number of attributes, including location, normal, color, texture coordainates, etc. All these together make the vertex buffer.
> We can also supply an additional *element array*, which is an array of indices into the vertex buffer specifying the order to render them. This allows us to use one vertex more than once, or even skip a vertex we don't want to use. It determines how the vertices become triangles.
Creating and using vertex buffers requires some fiddly OpenGL code, because it can be very generic. We have abstracted the most common case into the **vbo** module (take a look inside it to see how it works):
```
-- load in the utility module for vertex buffer objects
local vbo = require "vbo"
-- create a VBO object to store vertex position and color data
-- this vbo contains 3 vertices (1 triangle):
local vertices = vbo(15)
-- set the vertex positions:
vertices[0].position:set(-1, -1, 0)
vertices[0].position:set( 1, -1, 0)
vertices[0].position:set( 0, 1, 0)
function draw()
-- start using the shader:
myshaderprogram:bind()
-- set a shader uniform:
myshaderprogram:uniform("lightcolor", 0.5, 0.5, 0.5)
-- tell the shader_program where to find the
-- 'position' attributes
-- when looking in the vertices VBO:
vertices:enable_position_attribute(myshaderprogram)
-- render using the data in the VBO:
vertices:draw()
-- detach the shader_program attributes:
vertices:disable_position_attribute(myshaderprogram)
-- detach the shader:
myshaderprogram:unbind()
end
```
-----
[](https://fbcdn-sphotos-d-a.akamaihd.net/hphotos-ak-ash3/1146629_10152155549169896_1044586992_n.jpg)
-----
[OpenGL 2.1 Reference Pages](http://www.opengl.org/sdk/docs/man2/)
[An intro to modern OpenGL](http://duriansoftware.com/joe/An-intro-to-modern-OpenGL.-Table-of-Contents.html)
[Lighthouse GLSL 1.2 Tutorial](http://www.lighthouse3d.com/tutorials/glsl-tutorial/)
